Tuesday, 4 November 2014

Burgundy Eyes | Autumn Edition

This Autumn, I have been all over simplicity and layering, which the two products I use, portray beautifully! I tend to only have about 10-15 minutes in the monring to do all my makeup, so anything quick and efficient is a perfect combo for me!
 
I have a few shades of the Maybelline Colour Tattoos, which are a pigmented creamy base product. The latest addition to the collection is Pomegranate Electric, a deep pomegranate/burgundy shade. The beauty of these cream based products, is that they are quick to apply. Either warm the product up with your fingers, and blend into the eye, or you can use a flat synthetic brush, which is my favourite of the two. I swipe this across my eye, and blend the edges with my finger. Quick and easy! These products are very forgiving, which is great for those rushed, dark autumnal mornings! Finally, I pat on a little Stila Pigalle. This sets and deepens that burgundy tone. You could use literally any similar shade you have for this step. I pair this look with cat eyeliner, my ultimate go to eyeliner.
 
This look is so quick to create, it barely needs a blog post, but I wanted to show some products that can create a vampy look, if like me, you're too afraid to pull off a dark lip!
 
LuceeLoves

Thursday, 28 August 2014

How To: DIY Polaroid Bunting

Living in a rented house has its restrictions, especially becoming wary what is acceptable to hang on the walls, etc. I love the idea of being able to carelessly hang up memories, without the picture frame or canvas. Many companies are offering their services to allow you to select your memorable snaps, and recreate them into a Polaroid look-a-like. At the moment, I'm on my summer break from university, which means my purse strings are most definitely taught. Being a creative somebody, I took to the net, especially Pinterest to get some inspiration on how to do this at home! This technique is so basic and simple, it by no means needs a blog post to demonstrate, but none the less, I think it is a great trick and I have some tips to create perfect DIY Polaroids!
Firstly, you want to pop onto Google, and find the Polaroid frame you want. I simply searched Polaroid Template, and tonnes pop up. You then want to copy the template image, save and then copy multiple times into Microsoft Word. I wanted around 10 photographs, but this is totally dependant on yourself. The beauty of this crafty DIY, is you can add more along, as you take more snaps! TIP: If you are running low on printing ink or photo paper, try and fit as many Polaroid's onto one page! I had already took my images from Instagram, and gave them a black and white filter. You can completely personalise them to fit your liking. 

I resized them to fit into the black Polaroid frame. Once I had completed this to all my images, I went ahead and grouped each image. This allowed me to ensure all the images were completely the same size. I right clicked to More Layout Options, and adjusted the size to the original template size. Somewhere along the line, it's easy to resize a bit too much, so this step ensures everything is inform for cutting out. Once the editing is complete, print the images out onto photo paper.
To begin assembling your bunting, you will need the following above. Not all are necessary, you can opt in or out, depending on your theme. I wanted to have a natural Hessian/Twine string, with mini pegs holding the Polaroids in place. I simply continued to pull out the length of string I desired, and added knots to the end, for a dishevelled finish, and pop the mini pegs in place. So easy! In these photos, I have held up my bunting with double backed masking tape, so I could adjust the height and positioning before hammering in some small tack pins.
Like I said, this post certainly didn't warrant a post of its own, but I think this is such a fab idea and so simple to do. I purchased the Twine and Mini Pegs from eBay and the glossy photo printing paper from Poundland. If you have your own Polaroid Bunting, or have been inspired by this post, let me know down below, or tag me on Instrgram or Twitter at @Luceeloves.

Twitter Facebook Instagram bloglovin Emails

Monday, 27 January 2014

Jar of Hearts. ♥

As soon as I seen these little beauties of glass jars, I knew I had to share them with you. I'm instantly attracted to all things glass. I think they look elegant on display - eventually, on my dressing table. I already have quite a large vintage sweet glass jar, which I actually picked up for £5 at Matalan. Such a good bargain, especially for it's size. This currently is holding all my Essie Polishes. So, as soon as I seen these two new jars, I knew they would make the perfect accompaniment. There were several sizes and shapes available, with the heart design on the front. As I knew I already have quite large one, I opted for a medium one, and a little small one. Initially, I fell in love with the frosted, textured glass, and wanted two in the same design but different sizes, but I thought it would look quite vintage to have contrasting textures, clashing amongst the dressing table.

I spent a good half an hour pondering in the aisle. I am terrible at shopping alone, so I decided to go for a medium size plain glass jar, which retails or £5.99, and the small textured heart jar, which retails at £4.99 - both available at TK Maxx. You could also grab yourself a square, tall or small jar, which I thought looked equally beautiful. I think they're are such individual pieces, that will stand out amongst the rest. I intend on filling them with some essential beauty products, to make for prettier storage. I'm really not sure yet - if you have any suggestions, let me know! 

I hope some of you found this post useful! I wouldn't have come across them unless I decided to have a little 'browse'. If anyone of you have any recommendations on where to find a good white dressing table, do let me know! Also, make sure to follow on Instagram at @luceeloves, to keep up to date with anything, before it reaches the blog!


Twitter Facebook Instagram bloglovin Emails

Sunday, 26 January 2014

Luxe Jesmond Gel Nails ♥


As a beauty blogger, my favourite aspect of all things beauty is nails. I love to have freshly manicured nails, usually lacquered with my favourite brand, Essie. However, for the past 7 weeks, I have been getting a Shellac or commonly known gel manicure. A gel manicure is essentially a gel formulated polish, which is cured under a UV light, which will last 2-3 weeks. I have included a collection of pictures of my nail, from the past few weeks, so you can compare the length of my nails. I began with quite short nails. I say short, although at the time I thought they were a fairly good length. Around two weeks later, I had another set of gel nails applied. You can already tell the length in which my nails have grown. I then chose to have thi gorgeous nude peach shade, which I have had so many compliments on, I actually considered getting it again. My nails have grown from strength to strength, longer than ever before with just regular nail polish. I wouldn't say I have brittle nails, they are generally quite strong, although they would end up breaking/splitting/peeling at a certain length. As this is my fourth set of gel nails, I thought it was about time to give a review as I have gained a really in-depth opinion!

Now, many people aren't too keen on gel nails. They can have a history of making your nails delicate or fragile, although throughout having mine continuously applied over 7 weeks, I have found my nails growing strength to strength. I always find getting my nails done, so therapeutic. For those who are quite new to gel nails, the process is really quite simple, but very effective! You start with your natural nails, which are filed and buffed into your desired shape. A specially formulated base coat is applied and cured under a UV light. This step is repeated with 2-3 layers of your chosen shade, and is finalised with a formulated gel top coat. Your gel nails will look incredibly glossy throughout the 2-3 weeks wearing.

As I have my own home, I of course have duties such as dishes, laundry, cleaning, etc. The gel nails are always put through the test with me! I find I have very minimal chipping at the end of the 2-3 weeks, which is just incredible. With an average, or my desired polish, Essie, I would find my nails lasted around 1 week, until I needed to repaint. Although the positive is a new shade to choose form, your nails wouldn't benefit from any added strength. Gel nails have added such length to my nails that I have never has before, I actually had to get them trimmed shorter, because they were growing so long! If you are someone who can't get on with acrylic nails, or extensions, like me, these are the perfect alternative! You have your own natural nails, with a polish to protect, strengthen and look gorgeous!

I visit the salon Luxe Jesmond, where you can find lots of deals regularly on there Twitter page @luxejesmond. They also have an amazing Instagram page, where you can see some beautiful nail candy! Of course, Luxe Jesmond also offer various treatments, such as waxing, eyebrows, lashes, tanning, and more. You must check out their beautifully decorated salon!


Twitter Facebook Instagram bloglovin Emails

Thursday, 16 January 2014

Stila: Written In The Stars

Lately, I have been obsessed with picking up small palettes. For me, they are the perfect size, and all the product I need, to achieve the look I'm going for. Sales are still making their rounds, when I spotted Stila bargain, offering their Written In The Stars palette for £3.75 down from £15, with free shipping! I couldn't really say no to a stunning palette for £4! I believe this originally came around in 2012 Christmas collection. As you can tell by the design of the packaging, Stila have opted for a beautiful snowflake design. After ordering, I did a little research, and many reviews complained about the pans being too small. For me, I don't find this a problem, at all. There is more than enough room to accommodate an eyeshadow and blend brush into the pans. Continuing on reviewing the packaging itself, Written In The Stars is encased in Stila's recognisable packaging of silver plastic, with a clear window, enabling you to clearly see what shades are available. Perfect for storing in your makeup collection, without opening. Something to point out, which you will see above, is the arm for the door of the packaging (what's the name?!) doesn't quite open all the way, so your left with the frame holding itself up. This isn't really a problem for me, but it could be a pain for some.

Written In The Stars is complete with 12 shadows; Starlight, Eden, Luna, Sun, Ray, Galaxy, Asteroid, Constellation, Pigalle, Bouquet, Heaven and Ariel. This palette offers a reasonable comparison of warmer, and cooler tones of pink and rosy tones. A very natural palette, which will allow you to create a neutral eye, or a warm, smokier eye. Shades 2, 6, 7 and 10 are matte, whilst the remainder include a soft shimmer. As you can see from the swatches above, the warmer tones do offer stronger pigmentation. The texture is like butter. The lighter shades don't translate too well, although I would primarily use these as a base to begin with, transition colour, or a highlight, so this isn't a negative aspect for myself, although it is worth noting.

Overall, I'm really happy I picked up this palette for the price I did. This is the first product I have purchased from Stila, and I'm happy with what I have received. If you have any other recommendations for me to try, do let me know below!


Twitter Facebook Instagram bloglovin Emails

Tuesday, 7 January 2014

Soap and Glory Glow All Out Highlighter & Supercat Eyeliner

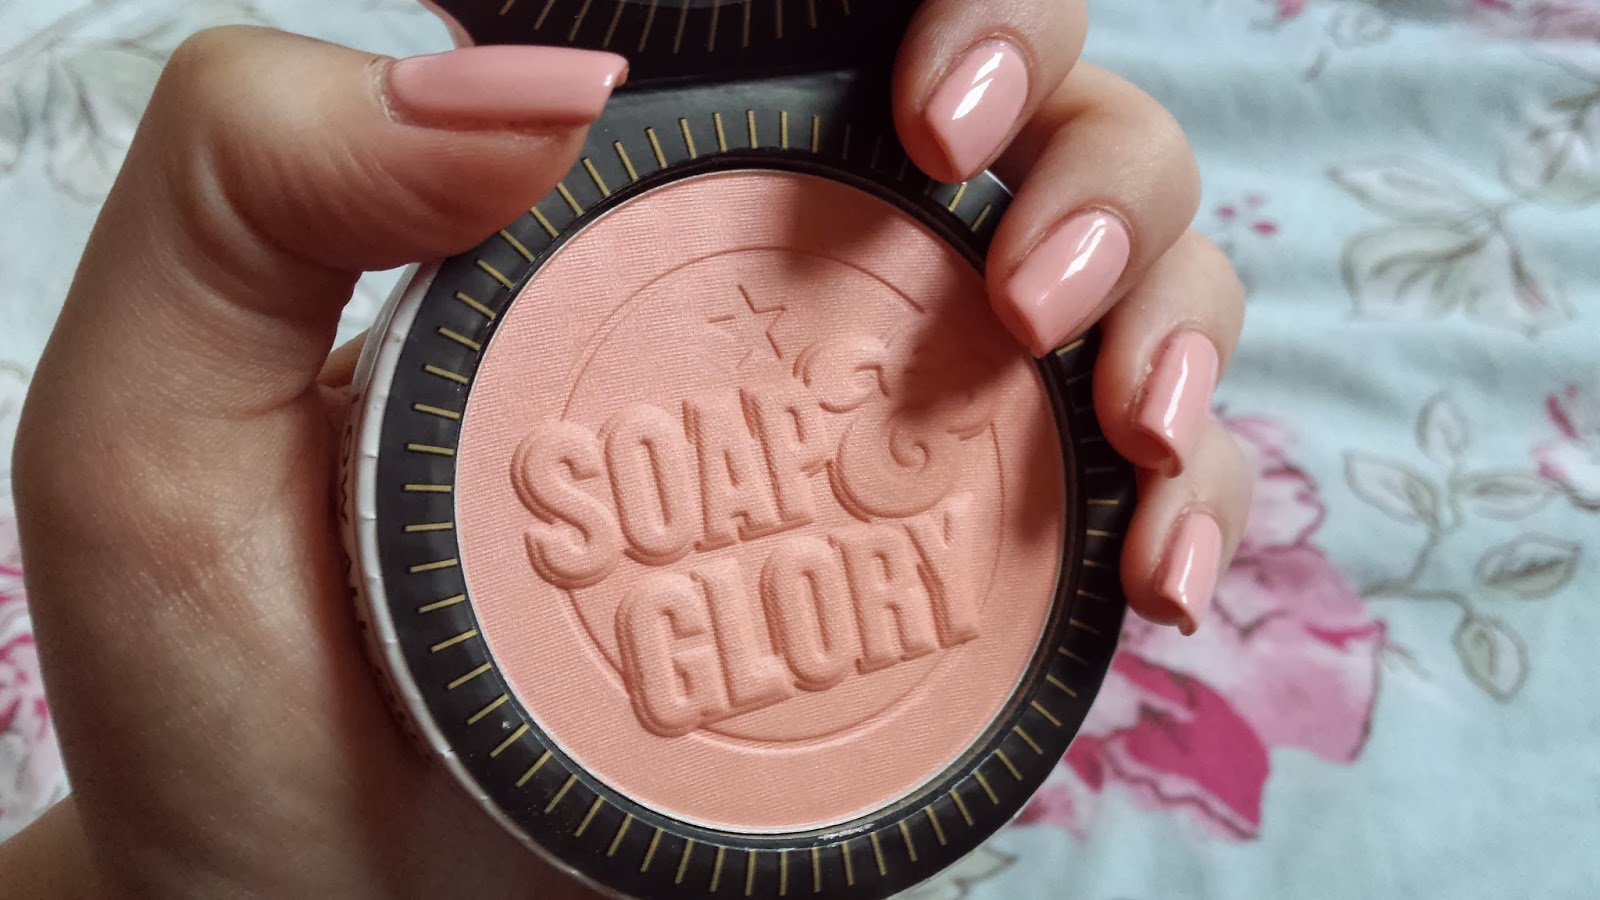
I am completely obsessed with all things Soap and Glory, as far as body care is concerned. I love their vintage and feminine packaging, sprinkling pink throughout my bathroom, and I have just stated to indulge in their skin care range. So, I thought it was about time I tested out what make up they had to offer. For a while, I have been eyeing up their Lid Stuff Palette, but with countless amount of nude shadows I use daily, I didn't think I needed a new one to the collection (okay, I DO want it!). For too long now, I've wanted to buy MAC's Soft and Gentle powder, but I just can't justify purchasing a high end highlighter, that I don't use yet. So, I opted for S&G Glow All Out Luminizing Face Powder. This gorgeous powder is encased in a retro inspired cardboard packaging. I know cardboard is the least favoured way of packaging products, it can wear away quickly, etc, but S&G have ensured this is secure with a magnetic closure, as well as protecting the product with durable cardboard. What I also love about the packaging, is it has a good sized mirror inside the compact, perfect for touch ups on the go!

The powder itself, has a beautiful embossed emblem of their signature logo. I think this is such a gorgeous touch, that they could have easily just missed out, and created a domed powder, but I love how they have added all the little touches. The powder itself is a stunning pink/champagne tone. I have very fair skin, so I didn't want anything too overpowering, as I am also very heavy handed with product, so I like to use something I can get away with being a little bit too bashful! I will be using this on my cheekbones, sweeping up to my brow bone, and if I'm feeling like the extra effort that day, down the bridge of my nose. This is such a subtle glow, that you can apply this everywhere that you would like to accentuate and highlight As I have oily skin, I tend to stick to a good matte foundation, currently Revlon Colourstay, although this is sometimes a little too drying, so adding some more luminosity and life back into my skin, in the form of a glowing powder, is just perfect.
Boots are currently running a Buy 1 Get 2nd Half Price on all Soap and Glory cosmetics, so I recommend you head straight down! I didn't notice this offer until I arrived, so I was quite overwhelmed with choice of what to take advantage of at half price! I have been eyeing up the Kick Ass Concealer, but I have been needing a good eyeliner. Originally, I loved to use a liquid eyeliner, although most recently, I have been dabbling into pen-like eyeliners, They are super easy to use, especially for beginners! The Supercat Eyeliner is unbelievable. It has a felt tip applicator, which is submerged in the product. I have found some pen eyeliners are drying before even buying them, so it's quite refreshing using such a good eyeliner, that does what it says! This is super pigmented and described as carbon black, which I would completely agree! As soon as I have applied this, it dries in an instant, and it stays put! Complete transfer proof, so for those with oily eyelids, or have trouble with your liner transferring, I honestly recommend you give this a go! I picked mine up half price for £3.00, which is amazing in itself!

I really would love to hear some other recommendations of S&G products, whether they are skincare or make up. I think S&G are such an honest brand, who have come so far. You really cannot go wrong with picking any of their products, making it perfect to purchase for a gift! I am currently trialling out their Thick and Fast Mascara, so I will definitely get back to you on that!

Illamasqua Vernau vs MUA Undressed

I recently featured Illamasqua Vernau on the blog, and today, I thought I would show you my reasons why. For my eye makeup, I tend to keep it simple daily. A neutral contoured eye, with a slick of liquid liner. It's simple to create, but I love the classic defined finish. I had been using an MUA Undressed (MUA, £4.00) for one shade, shade 6, for the sole purpose of adding a contoured shadow into my crease. I found it annoying I couldn't pick up this shade singly, so I revisited Illamasqua's sale, and came across a shade I found looked similar. I rarely online shop, and I never online shop for makeup. I'm one of those people that like to look at products in person. So, I was shopping blindly. I do have to rate Illamasqua's online moving swatches for each product. I think this is such a positive concept on their site, for people like me. You can see the product being used in motion, rather than seeing a still swatch.

I knew I wanted a warm shade, as I use it everyday, and Vernau (Illamasqua, £15.50) jumped out at me. With no second thoughts, I ordered it. The fact that at the time, it was also only £4.50, also acted in my favour. If my blind buying failed on me, at least I didn't wasted £15.50! As you can see from the swatched above, the MUA shade has incredibly poor pigmentation in comparison to the Illamasqua product. As the pigmentation I had been used to daily was weak, I had to become aware of Illamasqua's powerful pigmentation. I barely sweep my brush against the pan, and grab enough product to sweep in the hollows of my eye. Vernau is described as Yellow Ochre, and I believe this is one of those shades that you can blend with. Say you fancy a smokey eye, or a cut crease, you can use this as your base, to 'stencil' where you would like your shadow. This blends out to look like a natural shadow in your eye socket, which is exactly what I was looking for. I am so impressed with this eyeshadow, and I love the packaging. For this being my first high end eyeshadow, I would definitely consider purchasing more shades!

Don't forget to follow me and keep updated..